A womenswear tech pack can include a technical flat, a bill of materials and a full measurement chart—and still leave the factory’s sampling team making assumptions.
The gaps are often small but consequential: “clean finish” without a defined construction method, a front-length measurement without clear start and end points, or interfacing listed in the BOM without showing where it belongs. The factory then has to choose an interpretation. That choice may be technically reasonable but different from what the designer intended.
The result can be a sample that looks wrong, fits differently or costs more to remake, even when the workmanship itself is acceptable.
Before sending a new style for garment sampling, review the following three areas. They are among the details most likely to create avoidable questions, inconsistent quotations and additional sample rounds.
1. Define Construction Details That Affect the Result
Instructions such as “clean finish,” “neat inside” or “standard hem” describe an outcome, not a construction method. Several methods may achieve a similar visual intention, but they do not necessarily produce the same handle, fit, appearance or cost.
Where construction can change the finished garment, specify:
- Seam type and seam allowance
- Stitch type and stitches per inch (SPI)
- Edge-finishing method
- Topstitch position and distance from the edge or seam
- Hem depth and construction
- Binding, facing or lining construction
- Closure type and installation method
- Pressing and shaping requirements
These details deserve particular attention in fitted garments, delicate fabrics, asymmetric designs, cut-outs and styles with unusual seam lines.
Why “Clean-Finished Neckline” Is Not a Complete Instruction
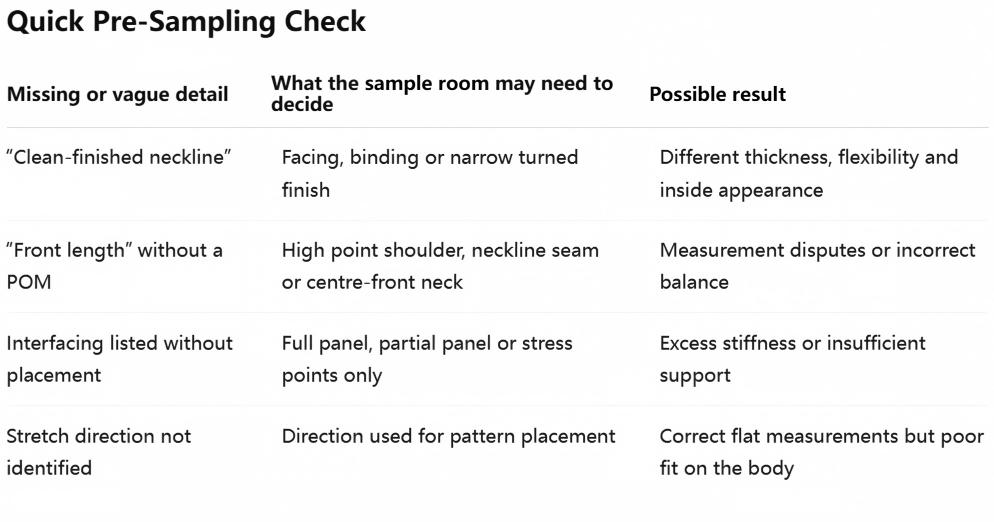
A bagged-out facing, binding and narrow turned finish can all be described as clean. However, each method produces a different edge.
- A facing can support the neckline but may add layers at seam intersections.
- Binding can create a controlled edge but changes the visible or internal finish.
- A narrow turned finish may be lighter, but it is not suitable for every curve or fabric.
The selected method can affect neckline roll, edge thickness, stretch, sewing time, machinery requirements and production cost. If one result is required, name the construction instead of asking the factory to infer it.
For a complicated area, add a labelled cross-section drawing. Show the layer order, fold direction, seam allowance and stitch position. One precise diagram is usually clearer than a paragraph of general instructions.
Brands that need help translating design intent into factory-ready specifications can discuss the style with our technical design and sample-development team.

2. Define How Every Critical Measurement Is Taken
A measurement specification needs to explain both what the target is and how the factory should measure it.
For example, “front length: 84 cm” is incomplete if the starting point is not defined. Measuring from the high point shoulder, neckline seam or centre-front neck can produce different numbers. The finished garment might follow the factory’s interpretation and still fail the brand’s fit review.
For every critical point of measurement (POM), define:
- The exact start and end points
- Whether the reference is a seam, finished edge or imaginary line
- Whether the garment is measured flat, relaxed or stretched
- Whether zips, buttons or other closures are open or closed
- Whether curved areas follow the seam or use a straight-line measurement
- The base size used for development
- The permitted plus/minus tolerance
Use a Numbered POM Diagram
Written instructions are useful, but a numbered diagram removes more ambiguity. The numbers on the drawing should match the IDs in the measurement table.
Diagrams are especially useful for front and back body length, neckline width and drop, shoulder slope, armhole depth, bust, waist and hip position, sleeve length and opening, skirt sweep, and curved or asymmetric seam placement.
If a measurement follows a curve, state that explicitly. If it is taken as a straight line, show that line on the diagram.
Set Tolerances by Garment and Measurement
Do not copy the same tolerance column into every style. An acceptable variation for an oversized cotton shirt may be unsuitable for a fitted woven dress.
Tolerance should reflect fabric stability and stretch, construction method, garment category, production process, and the measurement’s effect on fit and function.
Critical dimensions—such as a close-fitting waist, closure length or strap position—may require tighter control than a non-critical sweep measurement. Agreeing on the measurement method and tolerance before sampling makes later fit comments more objective.
3. Show Exact Material Placement and Reinforcement
A bill of materials identifies what is used. It does not always explain where, how much or in which direction the material should be applied.
This matters for visible fabrics and internal components such as fusible or sew-in interfacing, stay tape, clear elastic, binding, underlining, shoulder or seam reinforcement, boning, full or partial lining, and stabilisation around zips, buttons and other closures.
Listing “fusible interfacing” in the BOM is not enough if the construction pages do not show whether it applies to the full waistband, one layer only, a partial panel or selected stress points.
The specification should identify the component, placement, weight or quality reference, application direction and any relevant test or approval requirement. Too much reinforcement can make a garment stiff; too little can lead to stretching, distortion or poor recovery.

Record Fabric Direction and Placement Requirements
Where they affect the finished garment, show:
- Grain direction
- Stretch direction
- Nap or pile direction
- Print placement
- Stripe or check matching
- Panel-to-panel colour matching
- Lace motif placement
- Cutting direction for directional fabrics
A stretch fabric cut in the wrong direction may match the flat measurement chart but perform incorrectly on the body. Directional placement can also change fabric consumption, cutting efficiency, production time and quotation accuracy.
Production-Ready Womenswear Tech Pack Checklist
A production-ready tech pack is not simply a collection of pages. Its drawings, measurement table, BOM and construction notes must describe the same intended garment.
Before requesting a sample, confirm that:
- Areas with more than one possible construction are fully defined.
- Every fit-critical measurement has a written and visual reference.
- Tolerances reflect the fabric, construction and garment category.
- Interfacing, elastic and reinforcement placement are shown.
- Grain, stretch, nap, print and motif requirements are identified.
- Revision numbers and dates are consistent across the file.
- The factory can quote and begin sampling without making design decisions on the brand’s behalf.
If several answers remain uncertain, review the tech pack before cutting begins. Clarifying a drawing or measurement at this stage is generally faster than diagnosing the same ambiguity after a sample has been sewn.
Frequently Asked Questions
What should be included in a womenswear tech pack?
A womenswear tech pack normally includes technical flat drawings, construction instructions, a bill of materials, points of measurement, finished garment measurements, tolerances, size specifications, colourways, label and packaging information, and relevant quality or testing requirements. The exact contents depend on the garment category and development stage.
Why does a garment sample differ from the original design?
A sample can differ when construction methods, measurement references, material placement or finishing requirements are open to interpretation. Fabric behaviour and pattern development can also affect the result. A clear tech pack helps separate a manufacturing issue from an unresolved design decision.
What is a point of measurement in a tech pack?
A point of measurement, or POM, defines where and how a garment dimension is taken. It should identify the start and end points, the garment condition and whether the tape follows a curve or a straight line.
What is measurement tolerance in garment production?
Measurement tolerance is the permitted variation between the specified measurement and the actual measurement of a sample or production garment. It should be set according to the fabric, construction method, garment type and the measurement’s effect on fit or function.
Does every construction detail need a diagram?
No. Standard constructions may only require a recognised seam or stitch specification. Diagrams are most useful for unusual, layered or asymmetric areas and wherever written instructions could lead to different outcomes.
When should a tech pack be reviewed?
Review it before the first sample and after every approved development change. The version released for bulk production should match the approved sample, confirmed materials, grading, construction and packaging requirements.
Check Your Tech Pack Before Sampling Begins
If you are developing a fitted, asymmetric or delicate-fabric womenswear style, unresolved technical details can add unnecessary sample rounds and slow down costing.
TY FASHION helps fashion brands review construction, measurement and material-placement details before sampling.
Send us your tech pack, garment sketch and a brief description of the style. We will identify the areas that need clarification and explain the appropriate next step before sampling begins.
Related Resources